Note
Work in progress. This document is the design for the QA dashboard and it is being used by SQuaRE developers during F16 and beyond.
Introduction
This document describes the implementation of a prototype dashboard for the Science Quality Analysis Harness (SQUASH) system.
As stated in the SQUASH QA Database Design the verification data sets use case gives us the opportunity to leverage the QA tests done in the past with pipeQA and more recently with HSC, DECam and CFHT in a comprehensive infrastructure preserving the code and practices developed by the verification datasets group.
For QA-0, SQUASH run the QA tests as an afterburner an pushes the results to a QA dashboard. That is integrated to the CI system for checking the stability of the LSST software against the science requirements for single image processing (see LPM-17), also known as key performance metrics (KPMs).
The development will follow a rapid prototype workflow to reach this goal more efficiently. The goal for X16 was to have a minimal viable product (MVP) in production computing a few metrics for one dataset (chft). For F16 we extended the dashboard adding support to multiple datasets and implemented the Code Changes feature to monitor the commits that had impact on the KPMs.
The current implementation can be found at https://squash.lsst.codes/
We expect to get early feedback from users and iterate to improve the system. The main goal is to anticipate SQUASH needs for commissioning, and leverage the production SDQA system based on the experience of testing the LSST software on precursor datasets.
Selecting the technology stack
The selected technologies prioritize the use of Python as the main development language, a mature framework like Django DRF and the Bokeh plotting library to create interactive visualization.
We also are considering to follow Vega-lite specification for plot data.
The QA analysis is being refactored to use the Measurements API being developed by SQuaRE.
Another component called post_qa is responsible to shim the information from the CI run and push all the results to the QA dashboard.
For QA-1 and QA-2, we plan to add FITS image visualization using FFTools JS API or opensource third party tools like Aladin Lite + HiPS image format or visiOmatic + PTIF image format.
Other project visualization needs are also being considered.
Architecture
The architecture of the SQUASH dashboard is shown in Figure 1. The QA-0 DB is modeled based on the current LSST baseline database schema adapted for this prototype.
The implemented uses the object-relational mapper (ORM) built in the Django framework and exposed to the dashboard through a REST API.
This choice makes it easy to replace the QA-0 DB and Django REST API by WebServ and QAserv later on.
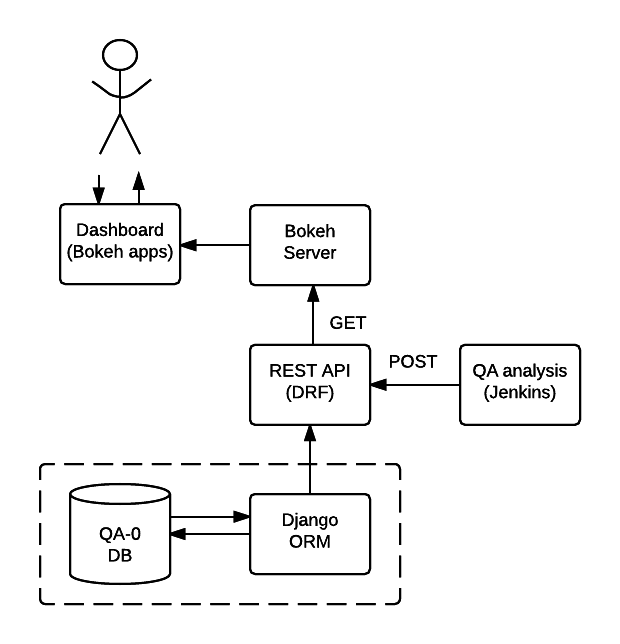
Figure 1 Main components of SQUASH dashboard prototype.
Implementation Epics
The dashboard API
For QA-0, the databade model includes the Job, Measurement, Metric and VersionedPackage tables which are
sufficient to characterize a metric and its measurement by the CI job and keep track of the version of all packages in the
LSST software stack.

Figure 2 QA-0 database schema.
The metrics table is initialized with the values specified in the science requirements document LPM-17, example:
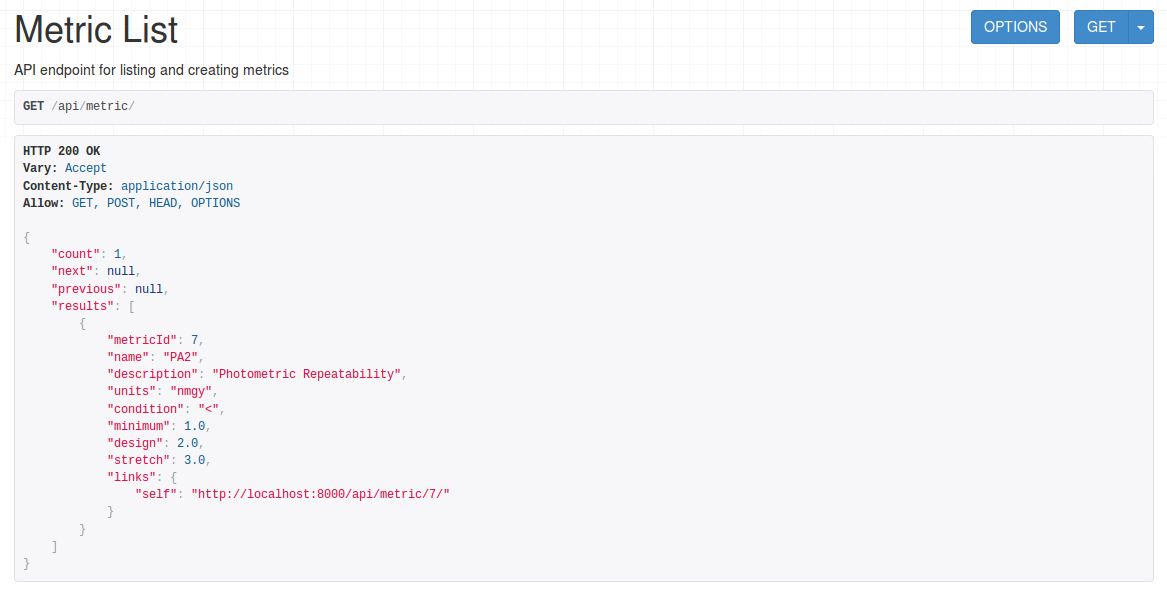
Figure 3 API endpoint for listing and creating metrics.
>>> import requests
>>> response = requests.get('http://localhost:8000/dashboard/api/')
>>> response.status_code
200
>>> api = response.json()
>>> api['metric']
'http://localhost:8000/api/metric/'
>>>
>>> metric = {
               "metric": "PA1",
               "description": "Photometric Repeatability",
               "units": "millimag",
               "minimum": 8,
               "design": 5,
               "stretch": 3,
               "user": 10,
               }
>>> response = requests.post(api['metric'], json=metric, auth=(TEST_USER, TEST_PASSWD))
>>> response.status_code
201
A job with a list of measurements and versioned packages can be inserted with a single request given the metric name, example:
>>> job = {
             "ci_id": "1",
             "ci_name": "validate_drp",
             "ci_dataset": "cfht",
             "ci_label": "centos-7",
             "ci_url": "https://ci.lsst.codes/job/validate_drp/1/",
             "status": 0,
             "measurements": [
                 {
                     "metric": "PA1",
                     "value": 1.0
                 },
                 {
                     "metric": "AM1",
                     "value": 2.0
                 },
                 {
                     "metric": "AM2",
                     "value": 3.0
                 }
             ],
             "packages": [
                 {
                     "name": "afw",
                     "git_url": "http://github.com/lsst/afw.git",
                     "git_commit": "a7aa450f60375473c010319e56db559457b43f9a",
                     "git_branch": "master",
                     "build_version": "b1"
                 }
             ]
           }

>>> response = requests.post(api['job'], json=job, auth=(TEST_USER, TEST_PASSWD))
>>> response.status_code
201
Using the API
Searching jobs by CI ID:
https://squash.lsst.codes/dashboard/api/jobs/?search=200
Filtering measurements by data set and metric:
https://squash.lsst.codes/dashboard/api/measurements/?job__ci_dataset=cfht&metric=AM1
References
- LSE-63 Data Quality Assurrance Plan
- LPM-17 Science Requirements Document
- LDM-135: Database Design
- LSST baseline Database Schema
- HiPS
- Django REST Framework
APPENDIX A - Making of the squash project
In this appendix we document the initial setup to create the Django project (tickets/DM-5728) and its integration with the bokeh server (tickets/DM-5750).
Creating the squash project
$ django-admin.py startproject squash
Running this command creates a new directory called squash, the manage.py file is used to manage a
number of aspects of the Django application such as creating the database and running the development web server.
Two other important files are squash/settings.py which contains the project settings
such as how to connect to the database and squash/urls.py which maps URLs called by the browser
to the appropriate Python code.
Creating the dashboard app
Lets create the dashboard app, every app in Django has its own model
$ python manage.py startapp dashboard
let Django knows about its existence by adding the new app at INSTALLED_APPS in squash/settings.py
# Application definition

INSTALLED_APPS = (
    'django.contrib.admin',
    'django.contrib.auth',
    'django.contrib.contenttypes',
    'django.contrib.sessions',
    'django.contrib.messages',
    'django.contrib.staticfiles',
    'dashboard',
)
Next step is to create the app models.
Setting up the database
SQuaSH uses MySQL/MariaDB for the development and production databases, it is implemented through the Django-MySQL
package to add specific features of MySQL/MariaDB to Django. In particular, we are interested in the JSON data type
to store the validate_drp outputs. That seems very convenient as these outputs can vary widely and we don’t want to
to turn all the details into a relational model.
- Install MySQL 5.7+ or MariaDB 10.1+ and create the development database
Using brew:
brew install mysql  (or mariadb)
mysql.server start
mysql -u root -e "CREATE DATABASE squash"
- Package dependencies
Add the following to the project requirements.txt
django-mysql==1.1.0
mysqlclient==1.3.9
- Add django-mysql and configure the database in the project settings
INSTALLED_APPS = (
     ...
     'django_mysql',
 )

DATABASES = {
     'default': {
        'ENGINE': 'django.db.backends.mysql',
        'NAME' : 'squash',
        'USER': 'root',
        'PASSWORD': '',
        'HOST': 'localhost',
        'PORT': '3306',
        'OPTIONS': {
              'charset': 'utf8mb4',
        },
        'TEST': {
            'CHARSET': 'utf8mb4',
            'COLLATION': 'utf8mb4_unicode_ci',
        },
    }
See note about supporting full Unicode in MySQL databases.
- Using the JSONField data type in your model
from django.db import models
from django_mysql.models import JSONField, Model

class Measurement(Model):
"""Store metric measurements associate to a job"""
    metric = models.ForeignKey(Metric, null=False)
    job = models.ForeignKey(Job, null=False, related_name='measurements')
    value = JSONField()

 def __float__(self):
     return self.value
As a result the new value field accepts basically anything that is supported by json.dumps, example:
measurement.value = "a string"
measurement.value = 1
measurement.value = 0.3
measurement.value = ["a", "list"]
measurement.value = {"a": "dict"}
- Finally initialize the development database
# Check your settings first
python manage.py check

# The password created here is used to access the django admin interface
export TEST_USER=<user for the development database>
export TEST_USER_EMAIL="$TEST_USER@example.com"

python manage.py createsuperuser --username $TEST_USER --email $TEST_USER_EMAIL

# Implement the models
python manage.py makemigrations
python manage.py migrate
Prototype layouts
Basic Styling
Download Bootstrap from http://getbootstrap.com/getting-started/#download
and extract it the static directory, it provides the basic styling for the website.
The static directory must be defined in the squash/settings.py file:
STATICFILES_DIRS = (
    os.path.join(BASE_DIR, 'static'),
    )
Integration with the bokeh server
APPENDIX B - JSON schema for SQUASH
Adapted from https://community.lsst.org/t/json-schema-for-squash/777
The purpose of this schema is to consistently describe results from validate_drp so that they can be reliably consumed by the
dashboard application and database. Having a schema means:
- Every new metric will be presented in a way that is consistent with the metrics already provided by validate_drp.
- Databases and HTTP APIs can be built to accept this schema. That is, the SQuaSH dashboard’s database schema and serialization code must understand and be compatible with this schema.
- The validate_drp output will be self-describing.
Our goal is to have validate_drp output a single JSON file that fully describes the QA run settings and measurements.
Some of this information won’t be known directly by validate_drp, and will instead be inserted into the JSON by the testing harness.
Ultimately this JSON data structure would be POST’d to the SQuaSH Dashboard API with a single HTTP request.
Likewise, when an API consumer GETs a QA Job, this is the data structure that will be returned.
The top-level document: Job
In the QA dashboard, a Job represents a single QA run. This maps to the Job model above.
This Job document wraps everything that is known about a QA run, and is what will be POST’d to the SQuaSH dashboard’s API for database ingestion.
{
   "date": date time when the job was run (ISO 8601, e.g., 2016-05-13T18:27:53+00:00)
   "measurements": [{measurement document}, ...]
   "packages": [{ versioned package document}, ...]
   "ci_name": Jenkins CI job name.
   "ci_id": Jenkins CI job number
   "ci_url":  URL of build on Jenkins dashboard
   "status": Job status (0 = success, 1 = failure)
}
In this Job data structure, validate_drp is really only responsible for inserting the date and measurements fields. The harness will insert measurements, packages, and other ancillary metadata.
Package sub-document of Job
The Package document attempts to capture versioning information about each Stack package that was used during the QA run. A Job contains a list of all Package documents describing the entire Stack. Altogether, these form a pseudo-provenance scheme.
This document corresponds to the VersionedPackage model of the QA Dashboard database introduced in DM-5943.
{
  "name": EUPS package name, e.g. "afw",
  "git_url": Git URL of package, e.g. "http://github.com/lsst/afw.git",
  "git_commit": Git commit SHA1 for package
  "git_branch": Git branch that commit resides on (e.g., 'master')
  "build_version": EUPS build version identifier for package
}
Measurement sub-document of Job
A Job contains an array of measurements corresponding to metrics.
Each item in the measurement array is a Measurement document, it is the primary document type that validate_drp
should be concerned with. Measurement documents correspond to the Measurement model above.
{
  "metric": metric slug (e.g., AM1)
  "metric_url": URL linking to this metric's definition in documentation
  "value": { datum with measurement's scalar value }
  "parameters": { blob with measurement code parameters }
  "blob": { blob with extra data about measurement; for plotting }
}
Blob sub-document of Measurement
The Blob document of each Measurement will encapsulate any data about the measurement beyond the main scalar value. (While Parameters is for inputs/configurations, Blob is all about the output data). Information in the Blob can be used of rich plotting and data science.
Like Parameters, Blob will be stored as a blob in the database so that every metric/measurement can define its own schema for this information. Again, every value should be a Datum document to be self-describing.
{
  ... blob datum fields
  "schema_id": "metric-blob-number"
}
Datum micro-document
A Datum is a micro document that wraps all quantities stored in JSON. Datum allows every quantity to be self-describing. This will be useful for analysis and plotting codes.
{
   "value": numeric value (scalar or array)
   "units": astropy unit string (http://docs.astropy.org/en/v1.1.2/units/format.html)
   "label": label suitable for a plot axis (minus units)
   "description": a longer description
}